In a commercial kitchen, ventilation is everything. It controls heat, smoke, grease, and odors—keeping the environment safe and functional. But how are these systems actually installed?
Here’s a step-by-step breakdown of the installation process, from design to final inspection.
1. Site Assessment and Planning
Before anything is installed, professionals assess the kitchen layout, cooking equipment, building structure, and local code requirements. This helps determine:
-
The type of ventilation system needed
-
The size and placement of hoods
-
Duct routes and fan locations
-
Make-up air requirements
The planning phase also includes fire safety considerations and clearance requirements for ductwork and exhaust fans.
2. System Design and Equipment Selection
Once the site is assessed, engineers or HVAC contractors design the system. This includes:
-
Hood selection: Type I (for grease and smoke) or Type II (for heat and steam)
-
Ductwork design: Fire-rated, welded steel ducts that follow the shortest, most direct path to the exterior
-
Exhaust fan sizing: Based on CFM (cubic feet per minute) calculations for the kitchen’s cooking load
-
Make-up air unit design: To balance the air being removed and prevent negative pressure
At this point, drawings are submitted for code approval.
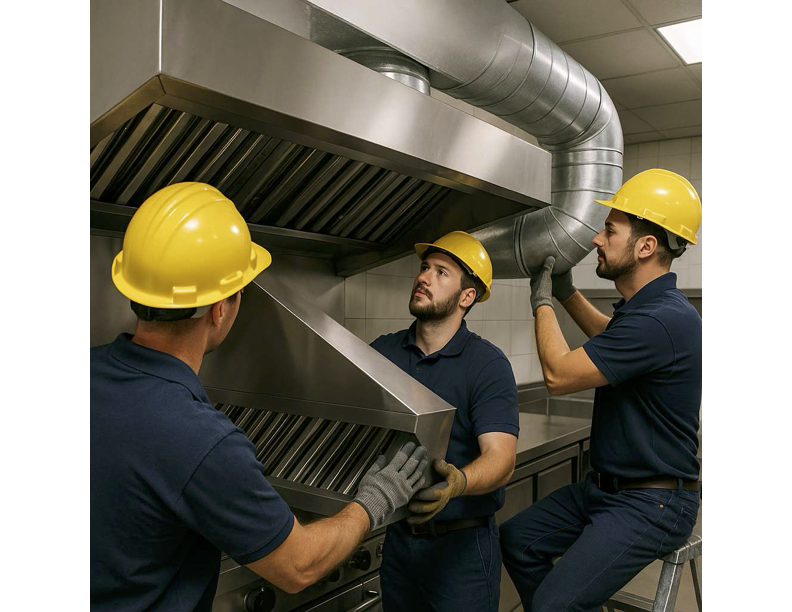
3. Installation of the Hood
Once equipment arrives, the hood is installed first. Key steps:
-
Securing the hood to the wall or ceiling structure
-
Ensuring it overhangs at least 6 inches beyond all sides of the cooking equipment
-
Connecting it to the fire suppression system (required for Type I hoods)
The hood must be perfectly level and aligned to ensure proper airflow capture.
4. Ductwork Installation
Ducts are run from the hood to the building exterior. This step includes:
-
Installing welded, grease-rated ductwork (for Type I hoods)
-
Maintaining the required slope (usually ¼ inch per foot) for drainage
-
Adding access panels for cleaning and inspection
-
Ensuring fire-rated clearance from other structures and combustible materials
In multi-story buildings, ducts may be enclosed in fire-rated shafts.
5. Exhaust and Make-Up Air Fans
Next, the installer mounts the exhaust fan on the roof or an exterior wall. It’s connected to the duct system to pull air out of the kitchen.
Simultaneously, a make-up air unit is installed to supply fresh air into the space. This is often heated or cooled to maintain comfort inside the kitchen.
6. Electrical and Control Integration
Ventilation systems often include controls for:
-
Turning on/off the fans
-
Activating make-up air systems
-
Monitoring air pressure and temperatures
-
Connecting the fire suppression system to the building alarm
Wiring and control panels are installed and tested to ensure everything operates automatically and safely.
7. Fire Suppression System Setup
A licensed technician installs and charges the fire suppression system. This includes:
-
Nozzles aimed at cooking appliances
-
Detectors and pull stations
-
Linkage to shut off fuel/electricity during activation
-
Connection to the building’s fire alarm panel
This system must be inspected and tested per NFPA 96 standards.
8. System Testing and Commissioning
Before the system goes live, it’s thoroughly tested. This includes:
-
Airflow measurements (to ensure proper CFM)
-
Hood capture efficiency
-
Balance between exhaust and make-up air
-
Fire suppression system functionality
Any adjustments are made to optimize performance and meet code.
9. Final Inspection and Approval
The last step is an inspection by local authorities—building, fire, and health departments. They verify:
-
Compliance with all applicable codes
-
Proper clearances, airflow, and equipment specs
-
Fire suppression and ventilation system functionality
Once approved, the kitchen is cleared to operate.
Bottom Line
Installing a commercial kitchen ventilation system is a complex, code-driven process. It takes coordination between engineers, contractors, and inspectors. When done right, it keeps your kitchen cooler, cleaner, safer—and open for business.
Need a custom ventilation setup or checklist for your restaurant buildout? Contact a member of our customer service team today!